SETUP
 For product assembly, setup, operation and additional user guide resources, please select from the following list of models:
- Mx high stand: MxSW2-hi / MxSW-hi / MxS-hi
- Mx low stand: MxSW2-lo / MxSW-lo / MxS-lo
- Mx dock: MxDW2 / MxDW / MxD
- Dock: DHCR, DHC, DH, DHCx, Dx, DLx
- Fan: Fx
- Stand: SRx, Sx, SRxN, SxN, SRxM, SxM
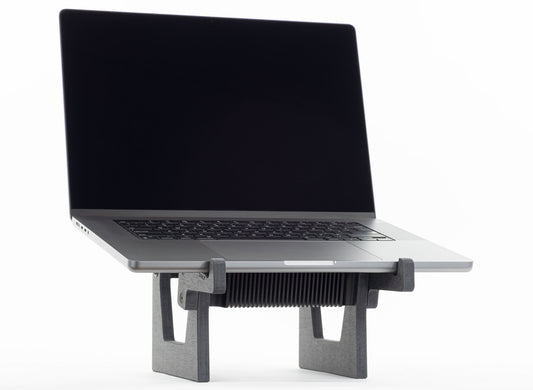
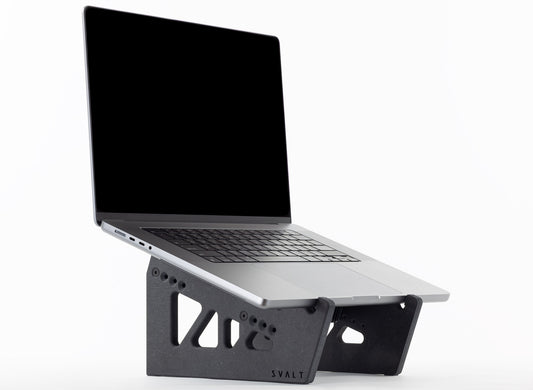
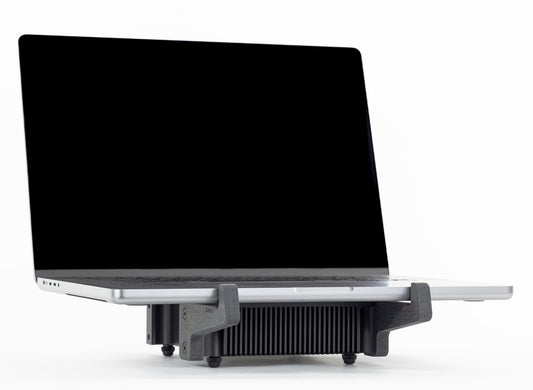
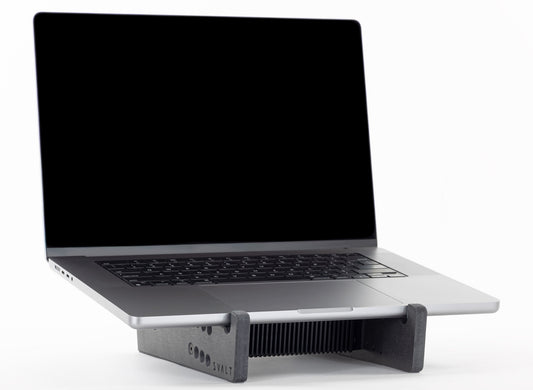
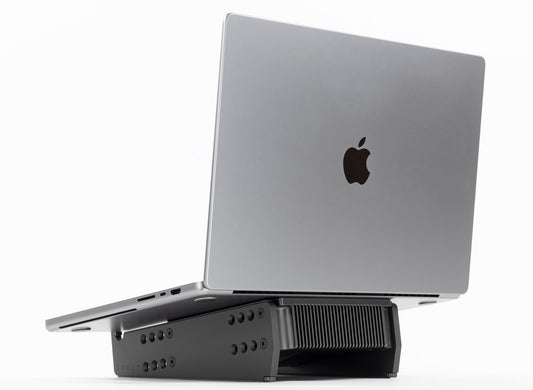
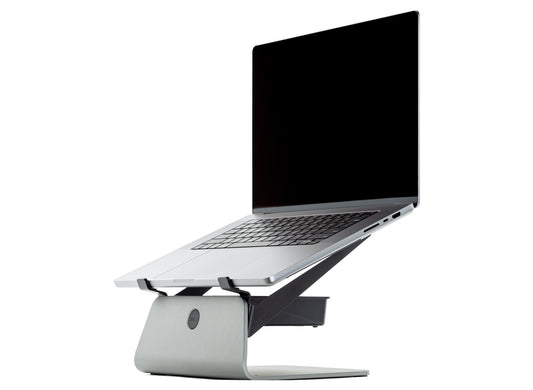
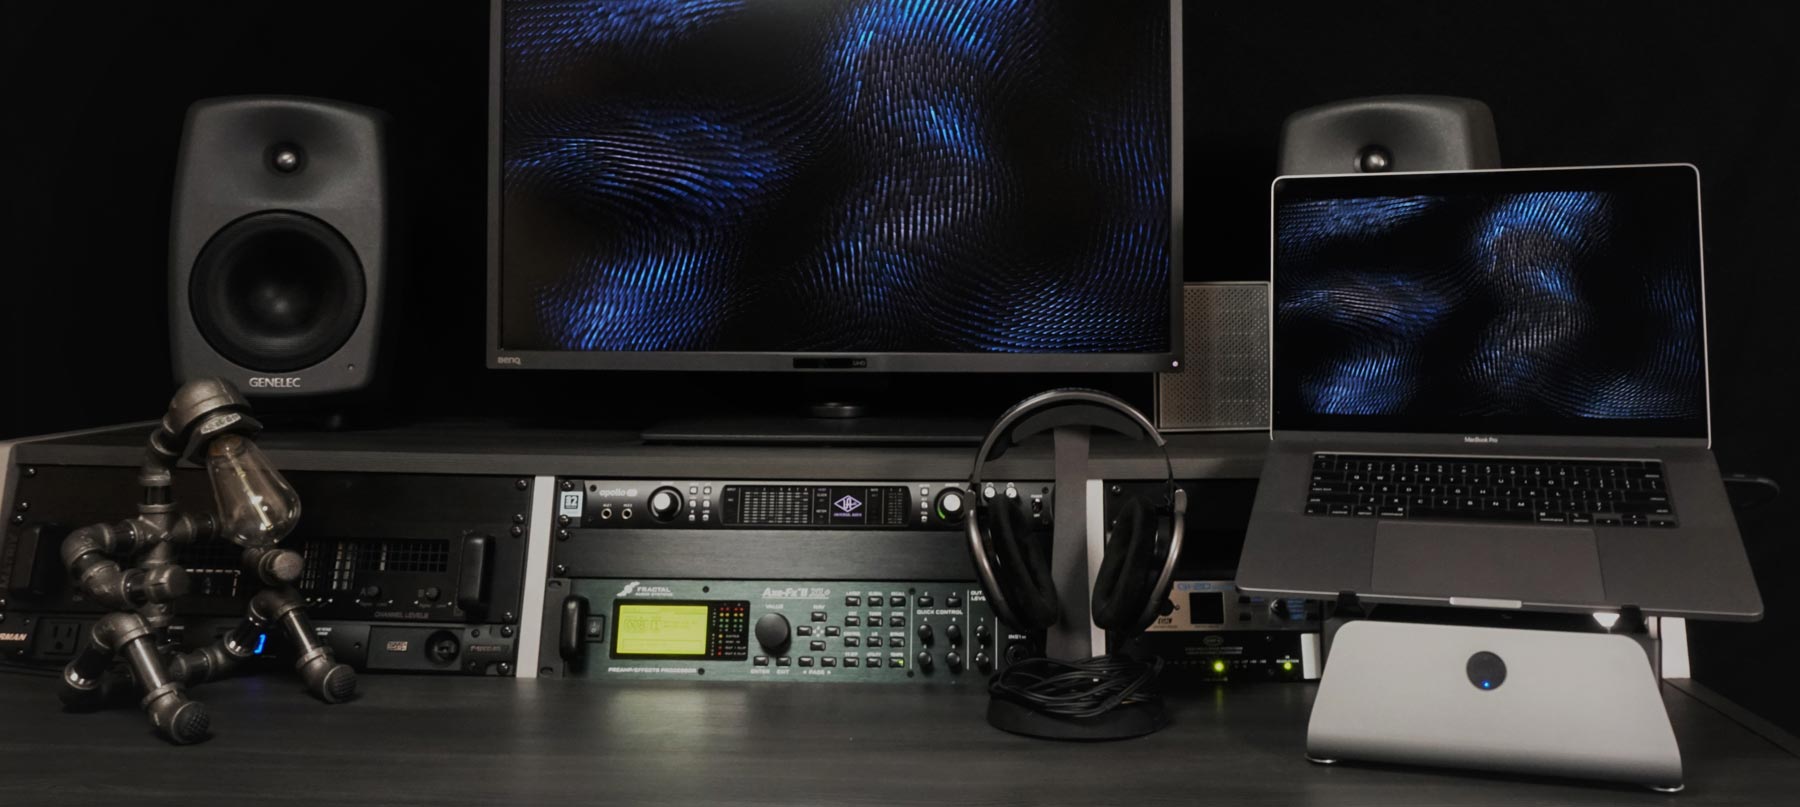
Cooling Dock DHCR
 Product Setup
Use the following step-by-step guide for product setup. Note that product and workstation setup has a significant impact on cooling performance. Please see the Workstation Setup page once product setup is complete.
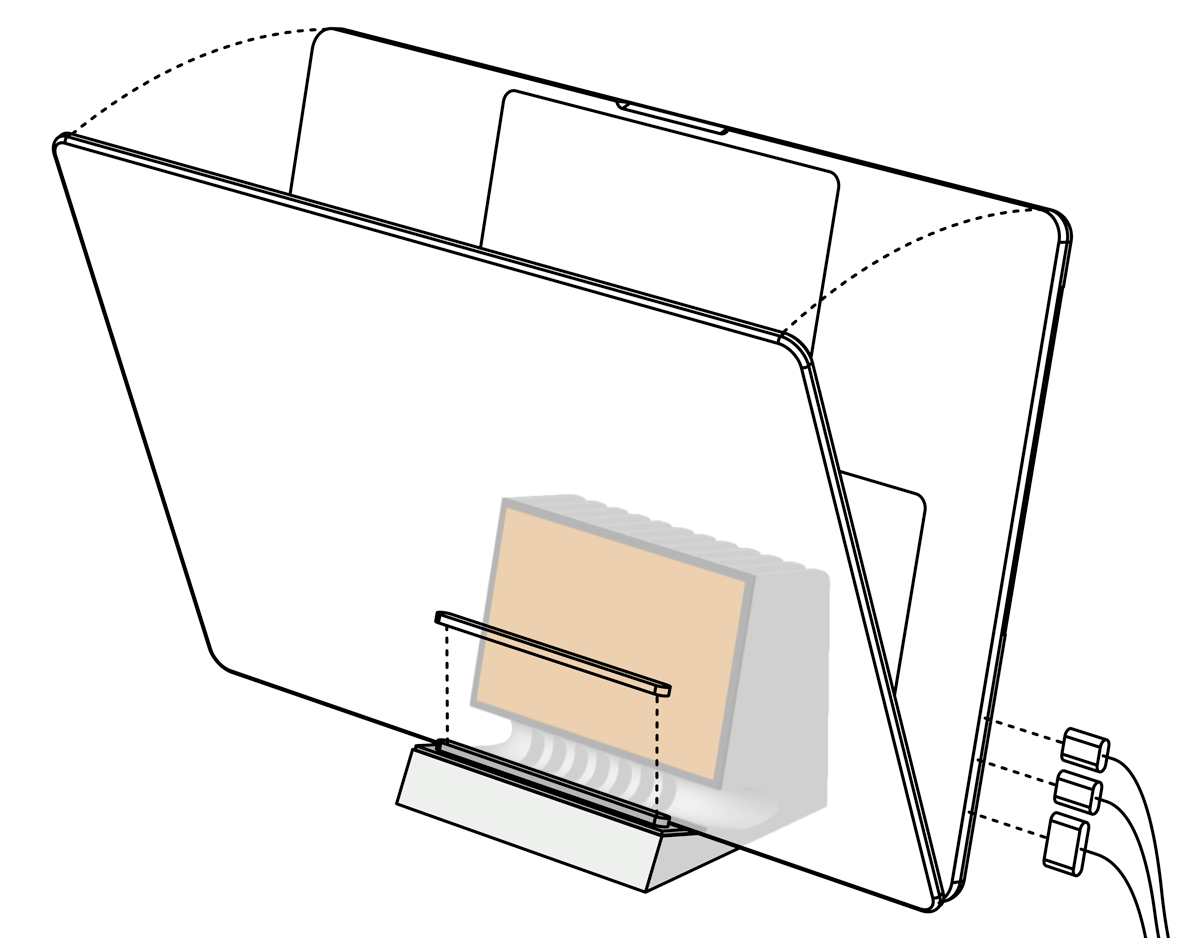
- If you selected the Protective Film / Thermal Assembly Coupling configuration, then do NOT remove the yellow-orange film as it is a special assembly of ultra-thin low-impedance thermally conductive materials. Alternatively, if you selected the Performance Metal / Direct Heatsink Coupling configuration, then take extra care when setting the laptop on the dock. See the next “Heatsink Laptop Coupling Plate” section for additional setup detail for both configurations.
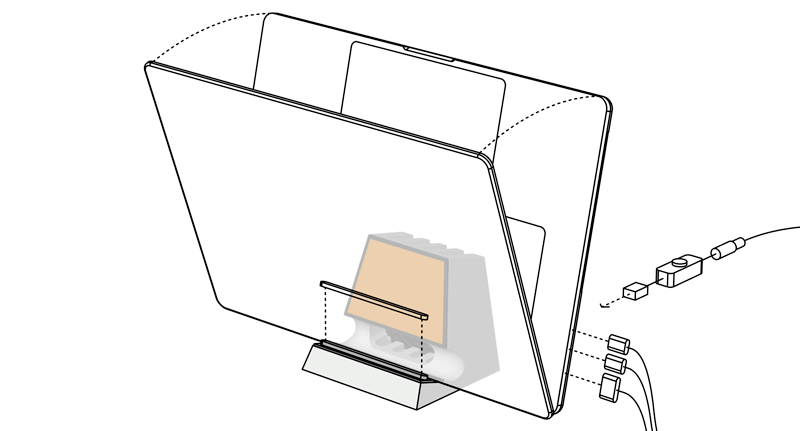
- Use the white microfiber cleaning cloth to remove any debris from the heatsink’s laptop coupling plate and from the back of the laptop where it will contact the heatsink. This improves heatsink coupling and reduces the potential for a hard object to become caught in-between the two surfaces, which could lead to scratching.
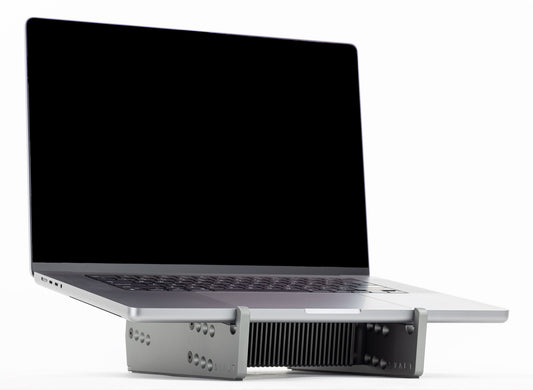
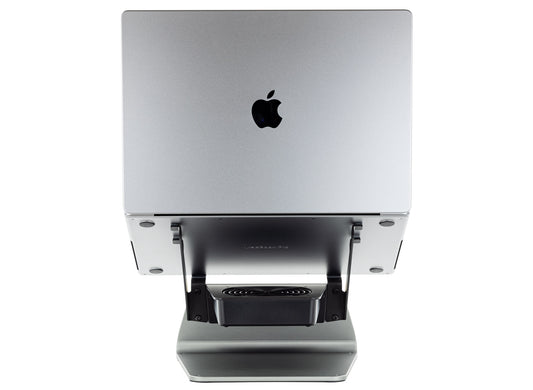
- Place a compatible laptop into the dock’s padded cradle with the laptop’s screen lid facing forward and the display hinge facing down. Note that use of a laptop cover will prevent the laptop’s metal enclosure from coupling with the DHCR’s heatsink.
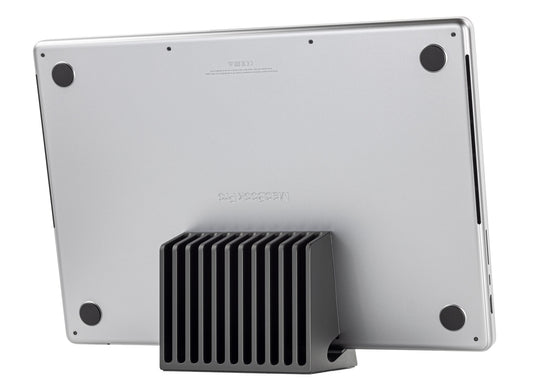
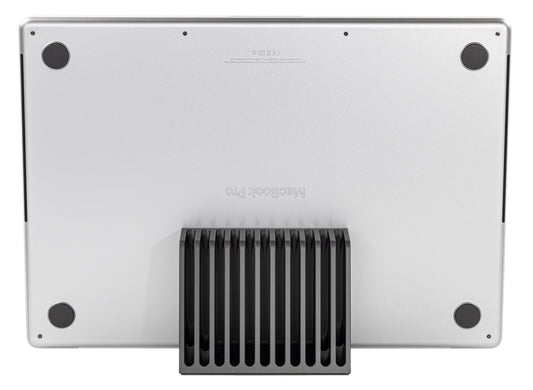
- Center the laptop from left to right within the dock’s padded cradle (unless you are using a 2012 or older laptop that may have off-center venting). Note that the DHCR heatsink width is set precisely to match the vent spacing of the 2021+ MacBook Pro, so take extra care in centering the laptop on the DHCR, which can be most easily achieved by looking down the back of the laptop and then using the laptop’s bottom enclosure fasteners as reference points for side-to-side alignment.
- Position the laptop on the laptop support cradle pads so that the laptop’s flat back surface is parallel with the dock’s laptop coupling plate while maintaining contact from top-to-bottom and side-to-side. Establishing an even contact across the surface is essential for achieving maximum heat extraction from the laptop and transferring heat into the heatsink. Note that the DHCR’s extra-large laptop coupling plate has been designed to fully contact flat backed/bottom laptops, such as the new generation of 2021+ MacBook Pro and 2022+ MacBook Air laptops. Other laptops without flat backs may not have direct contact along the lower portion of the DHCR laptop coupling plate, but that does not prevent the DHCR from having contact with the upper flat portion of the laptop surface.
- Once the laptop is in position, then install a Laptop Retention Pad to ensure that the laptop maintains tight and flat contact with the heatsink’s laptop coupling plate. Remove one of the three laptop retention pads from the product packaging. Remove the laptop retention pad’s adhesive backing. Install the pad onto the laptop shelf pad at the front edge of laptop. Push down on the pad so that the adhesive creates a bond. If a different laptop is used in the future with a different thickness, then remove the prior retention pad and install another.
The 4th generation DHCR is available with either direct metal-to-metal coupling or with a thermally conductive assembly applied over the coupling plate.
- Performance Metal / Direct Heatsink Coupling:
- The heatsink’s anodized aluminum coupling plate extends slightly beyond the top of the surrounding edge pads to achieve metal-to-metal surface contact. The coupling plate edges and corners have been rounded to remove sharp edges. However, care is required when setting up the laptop since the anodized aluminum surfaces of the laptop and heatsink will make direct metal-to-metal contact.
- The heatsink’s laptop coupling plate is specially prepared with a fine hand sanded finish that prioritizes functional performance and may not be as visually even as the rest of the heatsink that has a heavy-texture bead-blast surface.
- Protective Film / Thermal Assembly Coupling:
- The thermally conductive assembly is engineered and installed to prioritize technical performance over cosmetics. The assembly is made from ultra-thin and semi-transparent materials that may show surface variations such as areas of lighter, darker or uneven coloring. The underlying anodize color will impact both the resultant color of the assembly and visibility of surface variations. For instance, the lightest anodize color (silver) will result in the lightest yellow assembly color with the least visible surface variations, while the darkest anodize color (black) will result in the darkest orange assembly color with the most visible surface variations. Most of the darker colors will show at least some minor surface and color variations within the assembly. Exposure to heat from device coupling may reduce or eliminate some marks or uneven areas over time.
- Limit touching of the surface of the thermally conductive assembly as it easily absorbs oil from fingers and hand. Use the white microfiber cleaning cloth included within the product packaging to clean surface. Do not use a colored cloth as it will stain the surface. If additional cleaning is required, then dampened a portion of the microfiber cloth with water, soapy water or 70% isopropyl alcohol. Do not allow any moisture to get near edges where it could contact and potentially damage adhesives. Once clean, then polish surface with a dry portion of the microfiber cloth.
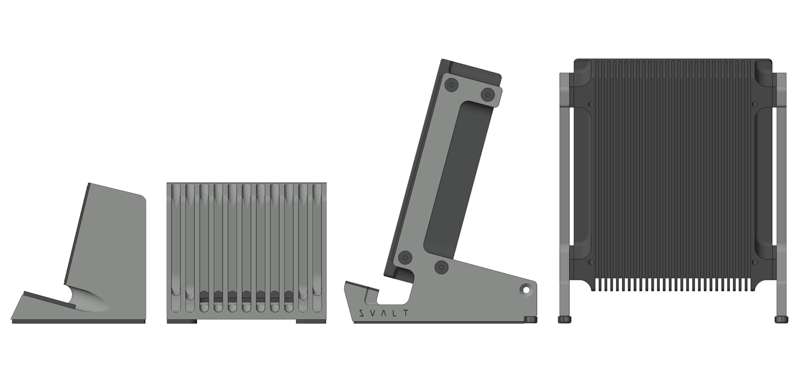
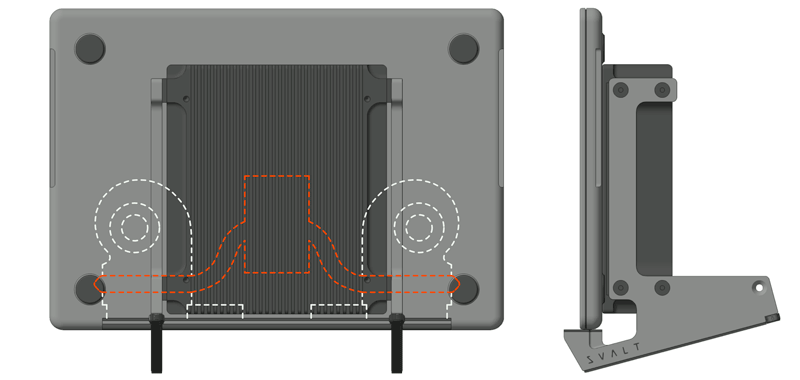
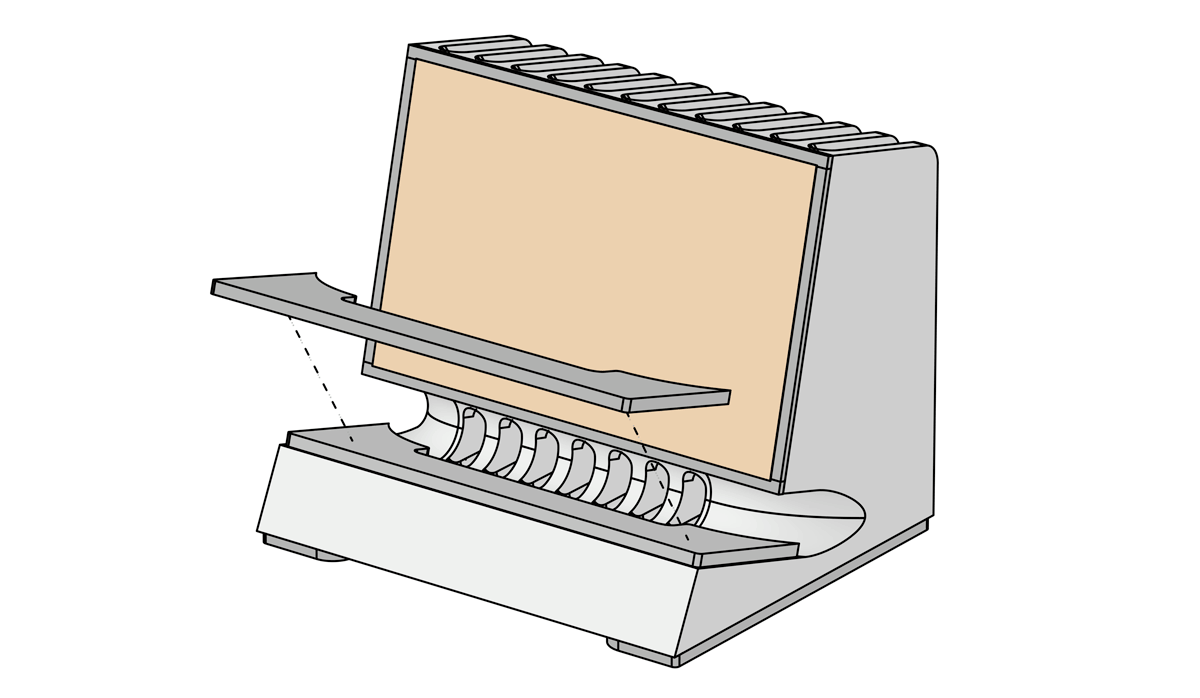
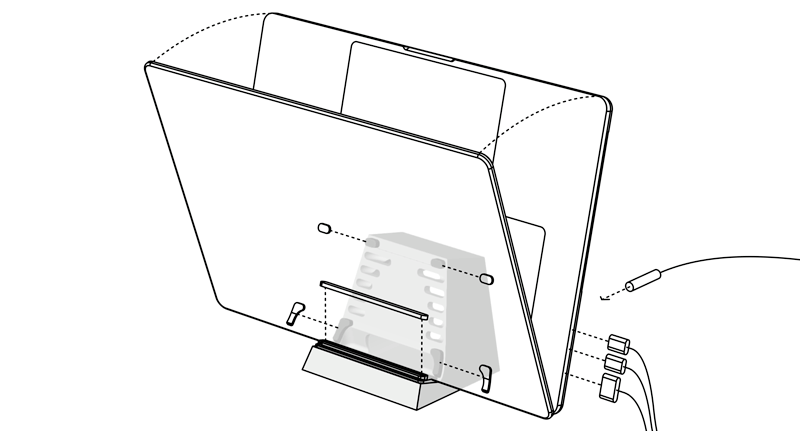
 Insulating Side Pads
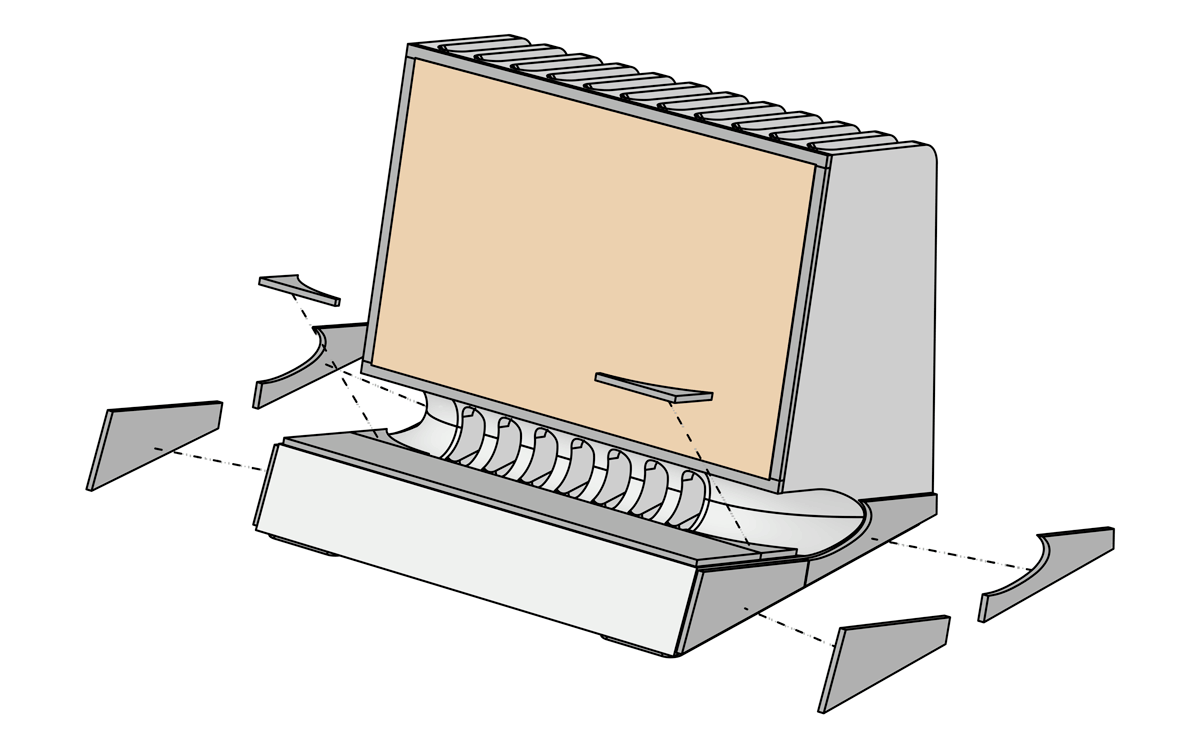
The Insulating Side Pads are not required, and are instead optional accessories provided for customers who want to maximize the cooling performance potential of their 4th generation DHCR Cooling Dock when used with a MacBook Pro. The Insulating Side Pads work in conjunction with either the 1/16” thick or 1/8” thick Performance Bottom Pads to protect the heatsink from hot air exhausted from a MacBook Pro or a PC laptop that includes built-in fans with bottom edge exhaust vents. The Insulating Side Pads are not recommended for use with a recent release MacBook Air and PC laptop that does not include a built-in air cooling system.
There are three or two pads to be installed on each side of the aluminum heatsink as shown in the diagrams above. If you have the 1/16” thick standard laptop support pad, then there are three pads per side, but there are only two pads per side if you have the 1/8” thick performance laptop support pad as it includes a curving edge where the third insulating pad would go. Please use the following technique to remove the pads from the adhesive backing:
- It is nearly impossible to peal the adhesive backing off of the pad, while it is relatively easy to roll the pad off of the adhesive backing.
- Start by holding the edges of the adhesive backing in one hand.
- Use the pointer finger of your other hand to lightly press into a corner of the padding so that only the padding is compressed without touching or deforming the edge of the backing.
- While pressing lightly into the padding, pull your finger back to roll just the corner of the pad up from the backing.
- Once the corner of the pad is released from the backing, then stop rolling the pad to prevent the adhesive from contacting the top surface of the pad, and instead pinch and pull the rest of the pad off the backing.
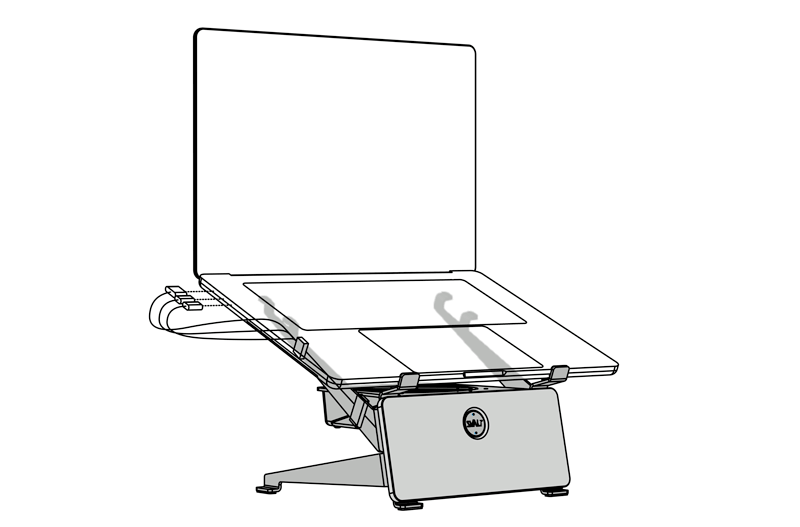
 Performance Laptop Support Pad
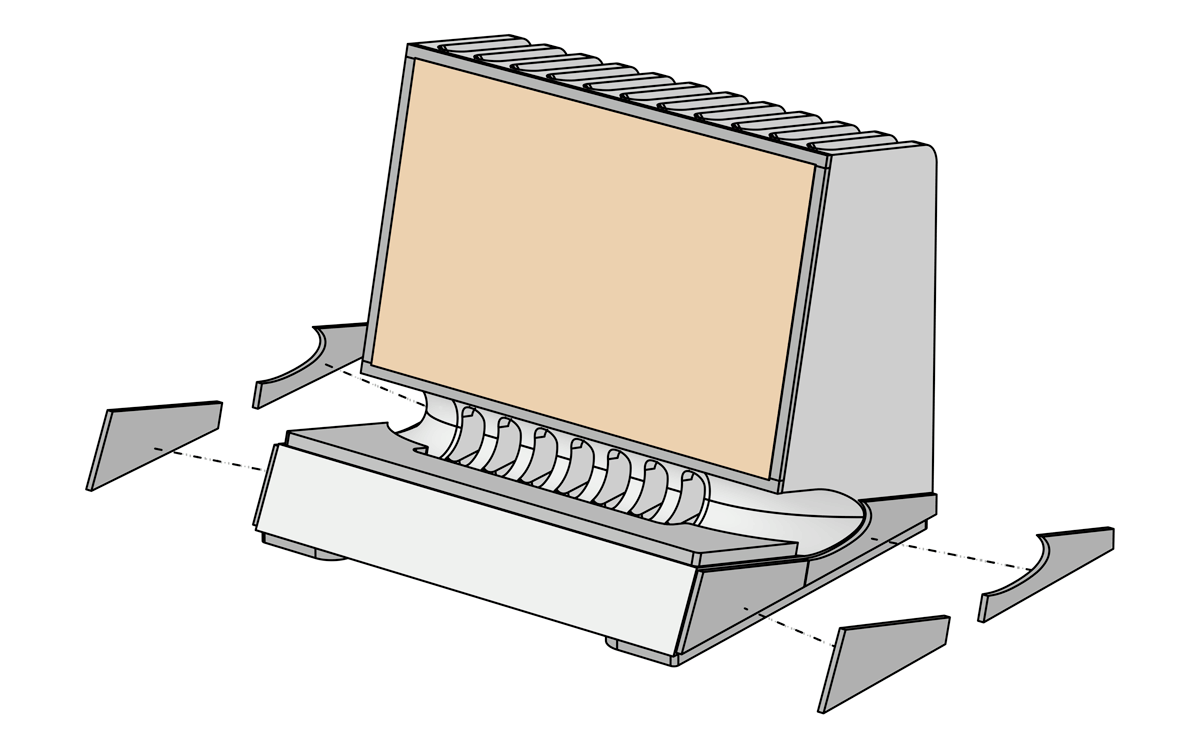
The Performance Laptop Support Pad offers a cooling airflow upgrade over the 1/16” thick straight cut Standard Laptop Support Pad. The Performance laptop pad with increased 1/8" thickness, center cutout to direct airflow into a laptop's central cold air intake vent, and end extensions to protect heatsink from a laptop’s hot exhaust air. Compared to the Standard Laptop Support Pad, the Performance Laptop Support Pad improve cooling with all laptop models, while they generate the most improvement when used with a 2021+ MacBook Pro and Fx Cooling Fan.
One pad to be installed along the front end of the aluminum heatsink's laptop support shelf as shown in the diagram and per the following process:
- Remove the standard laptop support pad.
- Place the new performance laptop support pad along the front edge of the laptop support shelf. The pad should be located on the flat surface of the shelf, avoiding the rounded edges so that adhesive is not left exposed to collect dust. Start by aligning a pad at one of the front corners, then lay down the rest of the pad while aligning it with the front edge of the shelf.
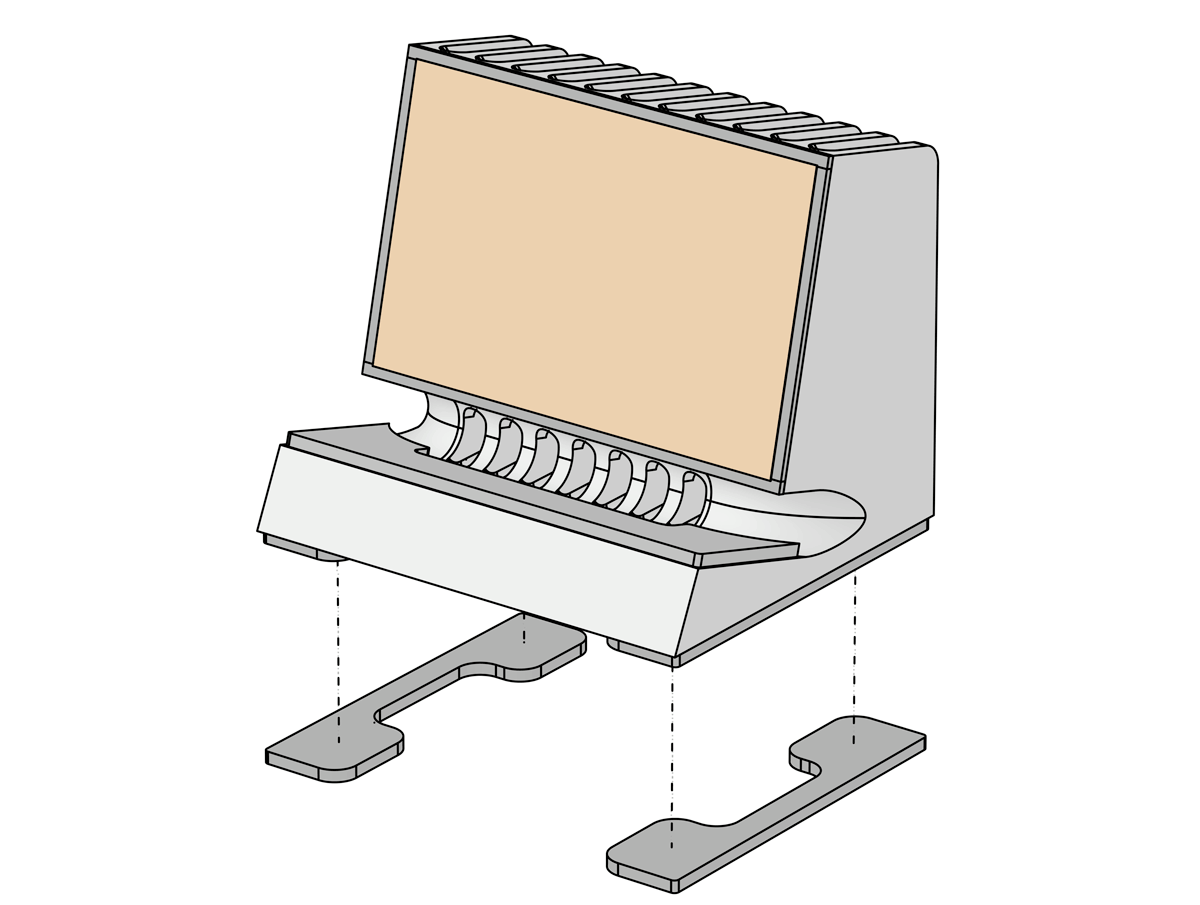 Performance Bottom Pads
The Performance Bottom Pads offer a cooling airflow upgrade over the 1/32” thick Standard Bottom Pads located along the front/back edge. The Performance Bottom Pads are available in 1/16” and 1/8” thickness, with the thicker pads offering maximum cooling performance. The Performance Bottom Pads create an open air channel to cool the underside of the heatsink. Compared to the Standard Bottom Pads, the Performance Bottom Pads improve cooling with all laptop models, while they generate the most improvement when used with a MacBook Pro and Fx Cooling Fan.
There are two pads to be installed on the bottom of the aluminum heatsink as shown in the diagram and per the following process:
- Remove the two thin standard bottom pads along the front and back edges. Removed pads can be placed onto the back side of the bag for the new high-performance bottom pads.
- Place the new performance bottom pads along the side edges. The pads should be located on the flat bottom surface, avoiding the rounded edges so that adhesive is not left exposed to collect dust. The pads should also be located closer to the back edge for stability. Start by aligning a pad at a back corner edge, then place the back edge of the pad, and finally lay down the rest of the pad while aligning it with the side edge.
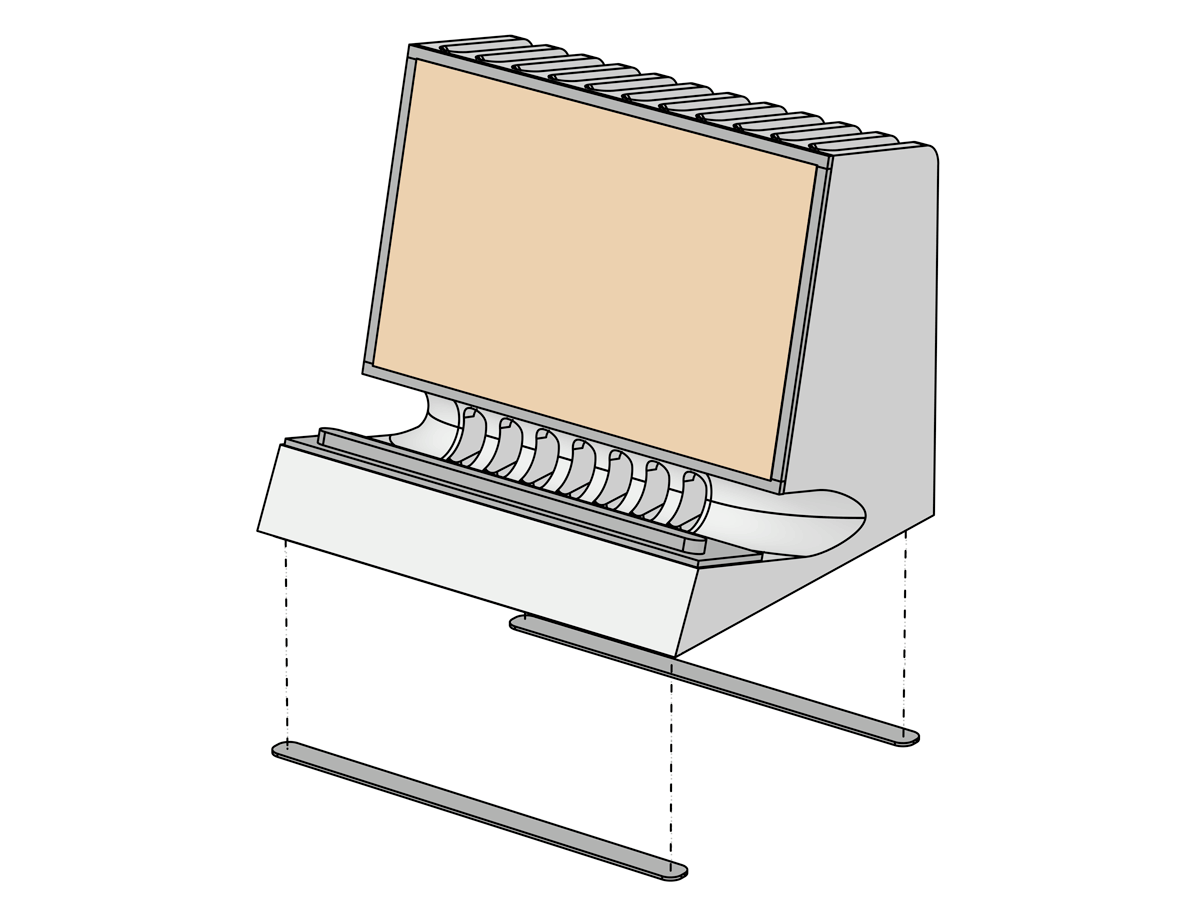 Standard Bottom Pads
The Performance Bottom Pads are recommended for improved cooling airflow, but if there’s a preference for the Standard Bottom Pads, then they can be installed instead.
There are two pads to be installed on the bottom of the aluminum heatsink as shown in the diagram and per the following process:
- Remove the two performance bottom pads along the sides. Removing the pads is likely to cause the adhesive to delaminate from the pads and to be left behind on the bottom surface of the heatsink.
- Place the new standard bottom pads along the front and back edges. The pads should be located on the flat bottom surface, avoiding the rounded edges so that adhesive is not left exposed to collect dust.
 Fx Cooling Fan
For customers that purchased a Fx Cooling Fan with the DHCR, then please see the Fx Cooling Fan setup below.
Additional Setup and User Guide Resources
- See Workstation Setup page to learn about setting up your workstation and laptop for optimum performance and productivity.
- See Clamshell Setup page to learn about setting up and operating in clamshell mode.
- See Upgrades page to learn about available upgrades.
- See Accessories page for available accessories.
- See DHCR product page for specifications.
Cooling Dock DHC
 Product setup and operation has a significant impact on cooling performance, as does workstation setup. This page assists with product setup, and once complete, then please see the Workstation Setup page.
Product Setup
- Do NOT remove the yellow-orange film as it is a special assembly of ultra-thin low-impedance thermally conductive materials.
- Use the white microfiber cleaning cloth to remove any debris from the heatsink’s laptop coupling plate and from the back of the laptop where it will contact the heatsink. This improves heatsink coupling and reduces the potential for a hard object to become caught in-between the two surfaces, which could lead to scratching.
- Place a compatible laptop into the dock’s padded cradle with the laptop’s screen lid facing forward and the display hinge facing down. Note that use of a laptop cover will prevent the laptop’s metal enclosure from coupling with the DHC’s heatsink.
- Center the laptop from left to right within the dock’s padded cradle (unless you are using a 2012 or older laptop that may have off-center venting).
- Position the laptop on the bottom cradle pads so that the laptop’s flat back surface is parallel with the dock’s thermally conductive coupling pad while maintaining contact from top-to-bottom and side-to-side. Establishing an even contact across the surface is essential for achieving maximum heat extraction from the laptop and transferring heat into the heatsink.
- Once the laptop is in position, then install a Laptop Retention Pad to ensure that the laptop maintains tight and flat contact with the heatsink’s laptop coupling plate. Remove one of the three laptop retention pads from the product packaging. Remove the laptop retention pad’s adhesive backing. Install the pad onto the laptop shelf pad at the front edge of laptop. Push down on the pad so that the adhesive creates a bond. If a different laptop is used in the future with a different thickness, then remove the prior retention pad and install another.
- The thermally conductive assembly is engineered and installed to prioritize technical performance over cosmetics, and may show small areas of lighter or darker color marks or areas of uneven coloring. Exposure to heat from device coupling may reduce or eliminate some marks or uneven areas.
- Limit touching thermally conductive surface as it easily absorbs oil from fingers and hand. Use the white microfiber cleaning cloth included within the product packaging to clean surface. Do not use a colored cloth as it will stain the surface. If additional cleaning is required, then dampened a portion of the microfiber cloth with water, soapy water or 70% isopropyl alcohol. Do not allow any moisture to get near edges where it could contact and potentially damage adhesives. Once clean, then polish surface with a dry portion of the microfiber cloth.
- See Cooling Fan Fx for setup and operation.
- See Workstation Setup page to learn about setting up your workstation and laptop for optimum performance and productivity.
- See Clamshell Setup page to learn about setting up and operating in clamshell mode.
- See Upgrades page to learn about available upgrades.
- See Accessories page for available accessories.
- See DHC product page for specifications.
Cooling Dock DH
 Product setup and operation has a significant impact on cooling performance, as does workstation setup. This page assists with product setup, and once complete, then please see the Workstation Setup page.
Product Setup
- Place a compatible laptop into the dock’s padded cradle with the laptop’s screen lid facing forward and the display hinge facing down. Note that use of a laptop cover will prevent the laptop’s metal enclosure from transferring heat to the DH’s heatsink.
- Center the laptop from left to right within the dock’s padded cradle (unless a 2012 or older laptop that may have off-center venting).
- Optional: A laptop retention pad can be installed to lock the laptop in place within the dock’s padded cradle. Remove one of the three laptop retention pads from the product packaging. Push the laptop into the cradle pads. Remove the laptop retention pad’s adhesive backing. Install the pad onto the laptop shelf pad at the front edge of laptop. Push down on the pad so that the adhesive creates a bond. If a different laptop is used in the future with a different thickness, then remove the prior laptop retention pad and install another.
- See Cooling Fan Fx for setup and operation.
- See Workstation Setup page to learn about setting up your workstation and laptop for optimum performance and productivity.
- See Clamshell Setup page to learn about setting up and operating in clamshell mode.
- See Upgrades page to learn about available upgrades.
- See Accessories page for available accessories.
- See DH product page for specifications.
Cooling Dock DHCx
 Product setup and operation has a significant impact on cooling performance, as does workstation setup. This page assists with product setup, and once complete, then please see the Workstation Setup page.
Product Setup
- Do NOT remove the yellow-orange film as it is a special assembly of ultra-thin low-impedance thermally conductive materials.
- Use the white microfiber cleaning cloth to remove any debris from the heatsink’s laptop coupling plate and from the back of the laptop where it will contact the heatsink. This improves heatsink coupling and reduces the potential for a hard object to become caught in-between the two surfaces, which could lead to scratching.
- Place a compatible laptop into the dock’s padded cradle with the laptop’s screen lid facing forward and the display hinge facing down. Note that use of a laptop cover will prevent the laptop’s metal enclosure from coupling with the DHCx’s heatsink.
- Center the laptop from left to right within the dock’s padded cradle (unless you are using a 2012 or older laptop that may have off-center venting).
- Position the laptop on the bottom cradle pads so that the laptop’s flat back surface is parallel with the dock’s thermally conductive coupling pad while maintaining contact from top-to-bottom and side-to-side. Establishing an even contact across the surface is essential for achieving maximum heat extraction from the laptop and transferring heat into the heatsink.
- Once the laptop is in position, then install a Laptop Retention Pad to ensure that the laptop maintains tight and flat contact with the heatsink’s laptop coupling plate. Remove one of the three laptop retention pads from the product packaging. Remove the laptop retention pad’s adhesive backing. Install the pad onto the laptop shelf pad at the front edge of laptop. Push down on the pad so that the adhesive creates a bond. If a different laptop is used in the future with a different thickness, then remove the prior retention pad and install another.
- Connect the power toggle switch and adapter’s 3/4-pin connector to the fan’s 3-pin or 4-pin connector, and then connect the other end’s 2.1mm power connector to the power supply. Insert the power adapter’s wall plug into a compatible power receptacle. For the B22 variable system, you can also connect the Noctua speed control between the fan and adapter switch, as well as the Noctua extension cable.
- Push the power pushbutton or toggle switch to turn the fan on and off. For the B22 fan with the Noctua speed control installed, you can dial-in a fan speed between 0-2200 RPM.
- Optional: Plug the power supply into a user provided control strip to quickly power on and off an entire workstation, or plug the power supply into a user provided smart home / Apple HomeKit accessory to wirelessly control on/off operation or set an on/off operation schedule.
- The thermally conductive assembly is engineered and installed to prioritize technical performance over cosmetics, and may show small areas of lighter or darker color marks or areas of uneven coloring. Exposure to heat from device coupling may reduce or eliminate some marks or uneven areas.
- Limit touching thermally conductive surface as it easily absorbs oil from fingers and hand. Use the white microfiber cleaning cloth included within the product packaging to clean surface. Do not use a colored cloth as it will stain the surface. If additional cleaning is required, then dampened a portion of the microfiber cloth with water, soapy water or 70% isopropyl alcohol. Do not allow any moisture to get near edges where it could contact and potentially damage adhesives. Once clean, then polish surface with a dry portion of the microfiber cloth.
- See Workstation Setup page to learn about setting up your workstation and laptop for optimum performance and productivity.
- See Clamshell Setup page to learn about setting up and operating in clamshell mode.
- See Right-to-Repair page for a step-by-step photo guide to removing or installing a fan for cleaning, servicing, replacement or upgrade.
- See Upgrades page to learn about available upgrades.
- See Accessories page for available accessories.
- See DHCx product pages for specifications.
Cooling Dock Dx
 Product setup and operation has a significant impact on cooling performance, as does workstation setup. This page assists with product setup, and once complete, then please see the Workstation Setup page.
Product Setup
- Optional: The dock comes with a single layer of 1/8” thick pads on the angled front surface. These pads protect the laptop and allow for increased cooling airflow into a laptop’s center intake cooling vent located along the laptop’s bottom/hinge edge on the 2021-2023 MacBook Pro (M2/M1 Pro/Max), 2012-2015 MacBook Pro (Intel Retina), 2010-2018 MacBook Air (Intel pre-Retina) and select PC laptops. For use with other laptops that do not have a center intake cooling vent, additional 1/16” pad layers should be installed as shown on the included pad label diagram to allow for increased cooling airflow along the laptop’s bottom enclosure surface.
- Place a compatible laptop into the dock’s padded cradle with the laptop’s screen lid facing forward and the display hinge facing down. Note that use of a laptop cover will prevent the Dx’s fan from cooling the laptop’s metal enclosure.
- Center the laptop from left to right within the dock’s padded cradle (unless a 2012 or older laptop that may have off-center venting).
- Optional: A laptop retention pad can be installed to lock the laptop in place within the dock’s padded cradle. Remove one of the three laptop retention pads from the product packaging. Push the laptop into the cradle pads. Remove the laptop retention pad’s adhesive backing. Install the pad onto the laptop shelf pad at the front edge of laptop. Push down on the pad so that the adhesive creates a bond. If a different laptop is used in the future with a different thickness, then remove the prior laptop retention pad and install another.
- Insert the power adapter’s 2.1mm plug into the power jack on the back side of the dock, and insert the power adapter’s wall plug into a compatible power receptacle.
- Press the pushbutton switch to turn the cooling system on and off.
- Optional: Plug the power supply into a user provided control strip to quickly power on and off an entire workstation, or plug the power supply into a user provided smart home / Apple HomeKit accessory to wirelessly control on/off operation or set an on/off operation schedule.
- See Workstation Setup page to learn about setting up your workstation and laptop for optimum performance and productivity.
- See Clamshell Setup page to learn about setting up and operating in clamshell mode.
- See Right-to-Repair page for a step-by-step photo guide to removing or installing a cooling system or fan for cleaning, servicing, replacement or upgrade.
- See Upgrades page to learn about available upgrades.
- See Accessories page for available accessories.
- See Dx product page for cooling system and other specifications.
- See D2 Operation page for Cooling Dock customers with one of the prior generation D2 cooling systems.
Cooling Dock DLx
 Product setup and operation has a significant impact on cooling performance, as does workstation setup. This page assists with product setup, and once complete, then please see the Workstation Setup page.
Product Setup
- Use the provided hex drive or hex key to loosen the two fasteners that hold the adjustable laptop retention pad in place, and slide the pad to the most open position.
- Place a compatible laptop into the dock’s padded cradle with the laptop’s screen lid facing forward and the display hinge facing down.
- Center the laptop from left to right within the dock’s padded cradle (unless a 2012 or older laptop that may have off-center venting).
- Push the laptop into the bottom pad so that the laptop makes a solid connection and seal with the dock’s cool air exhaust vent. Slide the adjustable laptop retention pad up against the laptop. Lightly tighten the two fasteners. Over tightening the fasteners is not required to hold the pad in place, and can damage the pad.
- Insert the power adapter’s 2.1mm plug into the power jack on the back side of the dock, and insert the power adapter’s wall plug into a compatible power receptacle.
- Press the pushbutton switch to turn the cooling system on and off.
- Optional: Plug the power supply into a user provided control strip to quickly power on and off an entire workstation, or plug the power supply into a user provided smart home / Apple HomeKit accessory to wirelessly control on/off operation or set an on/off operation schedule.
- See Workstation Setup page to learn about setting up your workstation and laptop for optimum performance and productivity.
- See Clamshell Setup page to learn about setting up and operating in clamshell mode.
- See Right-to-Repair page for a step-by-step photo guide to removing or installing a cooling system or fan for cleaning, servicing, replacement or upgrade.
- See Upgrades page to learn about available upgrades.
- See Accessories page for available accessories.
- See DLx product page for cooling system and other specifications.
- See D2 Operation page for Cooling Dock customers with one of the prior generation D2 cooling systems.
Cooling Fan Fx
Product setup and operation has a significant impact on cooling performance, as does workstation setup. This page assists with product setup, and once complete, then please see the Workstation Setup page.
Product Setup
- Place the Fx so that the fan drives air towards the back of a compatible Cooling Dock DHCR, DHC or DH heatsink model.
- Align the Fx with the center of the dock.
- For FxB16 and other lower airflow fans, place the Fx approximately 3 to 4 inches from the back of the dock. For FxR17, FxW20, FxG18, FxB22 and other higher airflow fans, increase the distance to approximately 5 to 6 inches. Note that these offset distances are recommended for all workstation setups as it allows the fan to run more efficiently with more airflow and less noise. It also creates the most beneficial airflow within and around the heatsink, including both cool air into the heatsink and into the laptop’s intake vent, as well as hot air from the laptop’s exhaust vents. However, these offset distances can be reduced by half if you are using a laptop without a built-in fan/air cooling system, such as a more recent 2020+ MacBook Air with Apple Silicon processor.
- Connect the adapter’s 3/4-pin connector to the fan’s 3-pin or 4-pin connector, and then connect the other end’s 2.1mm power connector to the power supply. Insert the power adapter’s wall plug into a compatible power receptacle. For the G18 and B22 variable-speed system, you can also connect the Noctua speed control between the fan and adapter switch.
- Push/toggle the power switch to turn the fan on and off. For the G18 and B22 fan with the Noctua speed control installed, you can dial-in a fan speed between zero and maximum RPM.
- Optional: Plug the power supply into a user provided control strip to quickly power on and off an entire workstation, or plug the power supply into a user provided smart home / Apple HomeKit accessory to wirelessly control on/off operation or set an on/off operation schedule.
- See Cooling Dock DHCR, DHC, DH models for product setup.
- See Right-to-Repair page for a step-by-step photo guide to removing or installing a fan for cleaning, servicing, replacement or upgrade.
- See Upgrades page to learn about available upgrades.
- See Accessories page for available accessories.
- See Fx product page for specifications.
- See Workstation Setup page to learn about setting up your workstation and laptop for optimum performance and productivity.
- See Clamshell Setup page to learn about setting up and operating in clamshell mode.
Back to top
Cooling Stand SRx
 Product setup and operation has a significant impact on cooling performance, as does workstation setup. This page assists with product setup, and once complete, then please see the Workstation Setup page.
Product Assembly
- Remove top layer of foam sheet from product packaging.
- Remove modular components (Support Mounting Plate, Laptops Support Arms, Support Legs, and Cooling Unit) from product packaging and place on foam sheet.
- Remove accessories from accessories box (the accessories box can also be removed from product packaging), then open lid and remove accessory envelopes with assembly instruction labels.
- Place Support Mounting Plate face down on foam sheet.
- Install Laptop Support Arms and Support Legs onto Support Mounting Plate per label instructions. Note that Arm and Leg mounting holes are oversized to allow them to be adjusted for leveling.
- Install Cooling Unit onto Support Mounting Plate per label instructions. Note that Cooling Unit mounting holes are oversized to allow for repositioning of the Cooling Unit so that the pushbutton switch does not rub against the side walls of the Support Mounting Plate.
- Optional: Install 1/32” thick pads for leveling beyond Arm and Leg adjustments.
- Optional: Install the Air Deflector to provide an increase in directed cooling performance and to prevent air from hitting hands. See Operation Guide and Setup Guide pages to learn more.
- Plug power supply cable into the underside of Cooling Unit per label instructions.
- Place a compatible laptop into the set of front pads on the Laptop Support Arms, then rotate down onto the back pads. Larger 15+ inch screen laptops rest on the back set of pads, while smaller laptops rest on the forward set of pads. Note that use of a laptop cover will prevent the SRx’s fan from cooling the laptop’s metal enclosure.
- Optional: Install Cable Straps around the Laptop Support Arms to hide the cables behind the arms and hold the cables in place for easy laptop setup.
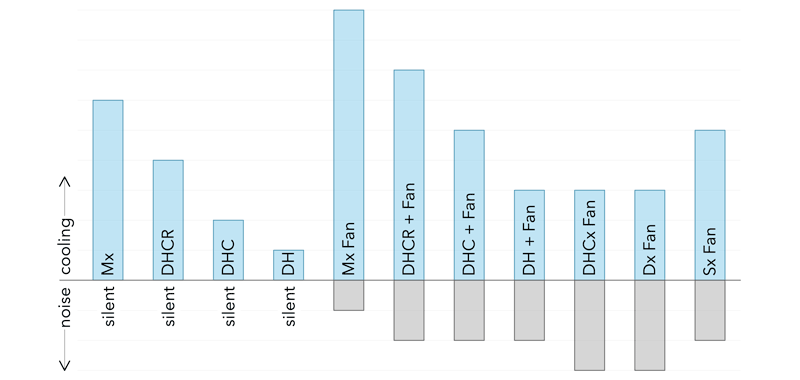
- Press the center of the user facing pushbutton switch to select from three levels of cooling and audio performance: off, low-speed and high-speed. Pressing the switch cycles from off -> low -> off -> high -> off and then repeats the cycle. The lower LED lights up when set to low-speed and the upper LED lights up when set to high-speed.
- Select off for silent passive airflow cooling.
- Select low-speed for ultra-quiet/quiet active airflow cooling.
- Select high-speed for maximum active airflow cooling.
- Optional: Plug the power supply into a user provided control strip to quickly power on and off an entire workstation, or plug the power supply into a user provided smart home / Apple HomeKit accessory to wirelessly control on/off operation or set an on/off operation schedule.
- See Workstation Setup page to learn about setting up your workstation and laptop for optimum performance and productivity.
- See Right-to-Repair page for a step-by-step photo guide to removing or installing a cooling system or fan for cleaning, servicing, replacement or upgrade.
- See Upgrades page to learn about available upgrades.
- See Accessories page for available accessories.
- See SRx product page for specifications.
- See Clamshell Setup page to learn about setting up and operating in clamshell mode.
Cooling Stand Sx
 Product setup and operation has a significant impact on cooling performance, as does workstation setup. This page assists with product setup, and once complete, then please see the Workstation Setup page.
Product Assembly
- Remove product by grabbing the side of the Cooling Unit and pulling straight up. The product is bolted to the cardboard insert and will come out with the product.
- Remove top layer of foam sheet from product packaging.
- Remove Laptops Support Arms from product packaging and place on foam sheet.
- Remove accessories from accessories box (the accessories box can also be removed from product packaging), then open lid and remove accessory envelopes with assembly instruction labels.
- Flip product over and place upside down on foam sheet. Per labeled instructions, unbolt cardboard insert from the bottom of the Support Base. Save fasteners and washes in Accessories box in case they are needed for repackaging in the future.
- Place product face down on the edge of the foam sheet.
- Install Laptop Support Arms per label instructions.
- Install a set of left and right Adjustable Laptop Support Pads onto the left and right front metal tabs, then install a set of left and right pads onto the rear metal tabs. Note that only one pad at each location is recommended for best cooling, but multiple pads can be placed on the rear tabs if multiple laptop sizes will be used on a single Stand.
- Optional: Install one or more of the Adjustable Height Feet for leveling.
- Optional: Install the Air Deflector to provide an increase in directed cooling performance and to prevent air from hitting hands. See Operation Guide and Setup Guide pages to learn more.
- Plug power supply cable into the underside of Cooling Unit per label instructions.
- Adjust left and right rear Laptop Support Pads to fit compatible laptop size.
- Place a compatible laptop onto Laptop Support Arms and Pads. Note that use of a laptop cover will prevent the Sx’s fan from cooling the laptop’s metal enclosure.
- Optional: Install Cable Straps around the Laptop Support Arms to hide the cables behind the arms and hold the cables in place for easy laptop setup.
- Press the center of the user facing pushbutton switch to select from three levels of cooling and audio performance: off, low-speed and high-speed. Pressing the switch cycles from off -> low -> off -> high -> off and then repeats the cycle. The lower LED lights up when set to low-speed and the upper LED lights up when set to high-speed.
- Select off for silent passive airflow cooling.
- Select low-speed for ultra-quiet/quiet active airflow cooling.
- Select high-speed for maximum active airflow cooling.
- Optional: Plug the power supply into a user provided control strip to quickly power on and off an entire workstation, or plug the power supply into a user provided smart home / Apple HomeKit accessory to wirelessly control on/off operation or set an on/off operation schedule.
- See Workstation Setup page to learn about setting up your workstation and laptop for optimum performance and productivity.
- See Right-to-Repair page for a step-by-step photo guide to removing or installing a cooling system or fan for cleaning, servicing, replacement or upgrade.
- See Upgrades page to learn about available upgrades.
- See Accessories page for available accessories.
- See Sx product page for specifications.
- See Clamshell Setup page to learn about setting up and operating in clamshell mode.
Cooling Stand SRxN
 Product setup and operation has a significant impact on cooling performance, as does workstation setup. This page assists with product setup, and once complete, then please see the Workstation Setup page.
Product Assembly
- Remove top layer of foam sheet from product packaging.
- Remove modular components (Support Mounting Plate, Laptops Support Arms, and Support Legs) from product packaging and place on foam sheet.
- Remove accessories from accessories box (the accessories box can also be removed from product packaging), then open lid and remove accessory envelopes with assembly instruction labels.
- Place Support Mounting Plate face down on foam sheet.
- Install Laptop Support Arms and Support Legs onto Support Mounting Plate per label instructions. Note that Arm and Leg mounting holes are oversized to allow them to be adjusted for leveling.
- Optional: Install 1/32” thick pads for leveling beyond Arm and Leg adjustments.
- Place a compatible laptop into the set of front pads on the Laptop Support Arms, then rotate down onto the back pads. Larger 15+ inch screen laptops rest on the back set of pads, while smaller laptops rest on the forward set of pads.
- Optional: Install Cable Straps around the Laptop Support Arms to hide the cables behind the arms and hold the cables in place for easy laptop setup.
- See Workstation Setup page to learn about setting up your workstation and laptop for optimum performance and productivity.
- See Right-to-Repair page for a step-by-step photo guide to removing or installing a cooling system or fan for cleaning, servicing, replacement or upgrade.
- See Upgrades page to learn about available upgrades.
- See Accessories page for available accessories.
- See SRxN product page for specifications.
- See Clamshell Setup page to learn about setting up and operating in clamshell mode.
Cooling Stand SxN
 Product setup and operation has a significant impact on cooling performance, as does workstation setup. This page assists with product setup, and once complete, then please see the Workstation Setup page.
Product Assembly
- Remove product by grabbing the side of the Support Base and pulling straight up. The Support Base is bolted to the cardboard insert and will come out with the product.
- Remove top layer of foam sheet from product packaging.
- Remove Laptops Support Arms from product packaging and place on foam sheet.
- Remove accessories from accessories box (the accessories box can also be removed from product packaging), then open lid and remove accessory envelopes with assembly instruction labels.
- Flip product over and place upside down on foam sheet. Per labeled instructions, unbolt cardboard insert from the bottom of the Support Base. Save fasteners and washes in Accessories box in case they are needed for repackaging in the future.
- Place Support Base face down on the edge of the foam sheet.
- Install Laptop Support Arms per label instructions.
- Install a set of left and right Adjustable Laptop Support Pads onto the left and right front metal tabs, then install a set of left and right pads onto the rear metal tabs. Note that only one pad at each location is recommended for best cooling, but multiple pads can be placed on the rear tabs if multiple laptop sizes will be used on a single Stand.
- Optional: Install one or more of the Adjustable Height Feet for leveling.
- Adjust left and right rear Laptop Support Pads to fit compatible laptop size.
- Place a compatible laptop onto Laptop Support Arms and Pads.
- Optional: Install Cable Straps around the Laptop Support Arms to hide the cables behind the arms and hold the cables in place for easy laptop setup.
- See Workstation Setup page to learn about setting up your workstation and laptop for optimum performance and productivity.
- See Right-to-Repair page for a step-by-step photo guide to removing or installing a cooling system or fan for cleaning, servicing, replacement or upgrade.
- See Upgrades page to learn about available upgrades.
- See Accessories page for available accessories.
- See SxN product page for specifications.
- See Clamshell Setup page to learn about setting up and operating in clamshell mode.
Cooling Stand SRxM
 Product setup and operation has a significant impact on cooling performance, as does workstation setup. This page assists with product setup, and once complete, then please see the Workstation Setup page.
Product Assembly
- Remove top layer of foam sheet from product packaging.
- Remove modular components (Support Mounting Plate, Support Legs, and Cooling Unit) from product packaging and place on foam sheet.
- Remove accessories from accessories box (the accessories box can also be removed from product packaging), then open lid and remove accessory envelopes with assembly instruction labels.
- Place Support Mounting Plate face down on foam sheet.
- Install Support Legs onto Support Mounting Plate per label instructions. Note that Leg mounting holes are oversized to allow them to be adjusted for leveling.
- Install Cooling Unit onto Support Mounting Plate per label instructions. Note that Cooling Unit mounting holes are oversized to allow for repositioning of the Cooling Unit so that the pushbutton switch does not rub against the side walls of the Support Mounting Plate.
- Optional: Install 1/32” thick pads for leveling beyond Leg adjustments.
- Optional: Install Mac Studio pads if using a Mac Studio desktop, or install Mac Mini pads if using a Mac Mini with the bottom cover removed.
- Optional: Install the optional dust filter to help reduce dust accumulation, and for users that choose to remove the Mac Mini’s bottom cover for direct internal component cooling. Use of a dust filter slightly decreases airflow and increases noise.
- Plug power supply cable into the underside of Cooling Unit per label instructions.
- Place a compatible Mac Studio or Mac Mini onto the four pads surrounding the fan exhaust.
- Optional: Remove the bottom cover on the Mac Mini (twist off or use supplied opener tool) to drive active airflow into the Mac Mini and directly cool internal components and processors. When the cover is off, the support pads lock the Mac Mini in place. Note that operating the Mac Mini with the bottom cover removed may not be considered normal operating conditions for the Mac Mini by Apple, and could impact warranty. A user installed dust filter accessory is included to help reduce internal dust accumulation, however, the user needs to first install the filter, and then to clean accumulated dust from the filter and computer as required. Dust filters reduce airflow and increase noise levels for a given airflow.
- Press the center of the user facing pushbutton switch to select from three levels of cooling and audio performance: off, low-speed and high-speed. Pressing the switch cycles from off -> low -> off -> high -> off and then repeats the cycle. The lower LED lights up when set to low-speed and the upper LED lights up when set to high-speed.
- Select off for silent passive airflow cooling.
- Select low-speed for ultra-quiet/quiet active airflow cooling.
- Select high-speed for maximum active airflow cooling.
- Optional: Plug the power supply into a user provided control strip to quickly power on and off an entire workstation, or plug the power supply into a user provided smart home / Apple HomeKit accessory to wirelessly control on/off operation or set an on/off operation schedule.
- See Workstation Setup page to learn about setting up your workstation and laptop for optimum performance and productivity.
- See Right-to-Repair page for a step-by-step photo guide to removing or installing a cooling system or fan for cleaning, servicing, replacement or upgrade.
- See Upgrades page to learn about available upgrades.
- See Accessories page for available accessories.
- See SRxM product page for specifications.
Cooling Stand SxM
 Product setup and operation has a significant impact on cooling performance, as does workstation setup. This page assists with product setup, and once complete, then please see the Workstation Setup page.
Product Assembly
- Remove product by grabbing the side of the Cooling Unit and pulling straight up. The product is bolted to the cardboard insert and will come out with the product.
- Remove top layer of foam sheet from product packaging.
- Remove accessories from accessories box (the accessories box can also be removed from product packaging), then open lid and remove accessory envelopes with assembly instruction labels.
- Flip product over and place upside down on foam sheet. Per labeled instructions, unbolt cardboard insert from the bottom of the Support Base. Save fasteners and washes in Accessories box in case they are needed for repackaging in the future.
- Optional: Install one or more of the Adjustable Height Feet for leveling.
- Optional: Install Mac Studio pads if using a Mac Studio desktop, or install Mac Mini pads if using a Mac Mini with the bottom cover removed.
- Optional: Install the optional dust filter to help reduce dust accumulation, and for users that choose to remove the Mac Mini’s bottom cover for direct internal component cooling. Use of a dust filter slightly decreases airflow and increases noise.
- Plug power supply cable into the underside of Cooling Unit per label instructions.
- Place a compatible Mac Studio or Mac Mini onto the four pads surrounding the fan exhaust.
- Optional: Remove the bottom cover on the Mac Mini (twist off or use supplied opener tool) to drive active airflow into the Mac Mini and directly cool internal components and processors. When the cover is off, the support pads lock the Mac Mini in place. Note that operating the Mac Mini with the bottom cover removed may not be considered normal operating conditions for the Mac Mini by Apple, and could impact warranty. A user installed dust filter accessory is included to help reduce internal dust accumulation, however, the user needs to first install the filter, and then to clean accumulated dust from the filter and computer as required. Dust filters reduce airflow and increase noise levels for a given airflow.
- Press the center of the user facing pushbutton switch to select from three levels of cooling and audio performance: off, low-speed and high-speed. Pressing the switch cycles from off -> low -> off -> high -> off and then repeats the cycle. The lower LED lights up when set to low-speed and the upper LED lights up when set to high-speed.
- Select off for silent passive airflow cooling.
- Select low-speed for ultra-quiet/quiet active airflow cooling.
- Select high-speed for maximum active airflow cooling.
- Optional: Plug the power supply into a user provided control strip to quickly power on and off an entire workstation, or plug the power supply into a user provided smart home / Apple HomeKit accessory to wirelessly control on/off operation or set an on/off operation schedule.
- See Workstation Setup page to learn about setting up your workstation and laptop for optimum performance and productivity.
- See Right-to-Repair page for a step-by-step photo guide to removing or installing a cooling system or fan for cleaning, servicing, replacement or upgrade.
- See Upgrades page to learn about available upgrades.
- See Accessories page for available accessories.
- See SxM product page for specifications.