D2 OPERATION

Select your D2 model:
- D2n Pro (November 2020 to September 2021)
- D2 Pro (September 2020 to September 2021)
- D2 Legacy (August 2017 to August 2020)
- D2 Legacy (October 2016 to July 2017)
- D2 Firmware Upgrades
- Resolving D2 System Issues
D2n Pro Operation with Firmware Version 4.0
The following operation guide is for the D2n Pro model with firmware version 4.0 available from November 2020 to September 2021.Cooling System Components
The following describes the cooling system’s major user interface components:
- Jack : A power jack located towards the bottom of the rear screen receives a power supply plug for powering the system. Only use the power supply included with product shipment or a Replacement Power Supply.
- Switch : A pushbutton switch located towards the bottom of the rear screen panel controls the system. After starting the cooling system as described below, pressing the switch two times (2x) to eight times (8x) will enable different cooling modes and additional functionality as described below. To register multiple switch entries, each switch depression needs to occur within 1.2 seconds of the last.
- LED : A LED located inside the rear screen and toward the bottom indicates switch inputs and the system’s enabled cooling mode. When starting up the cooling system or changing cooling modes, the LED will indicated the enabled cooling mode for 24-seconds (see Turbo and Custom Cooling Mode sections below for LED signal patterns). When shutting down the cooling system, the LED will momentarily light up and fade to off after 1-second. The LED is placed for visibility when leaning over the laptop and looking down the back side of the dock.
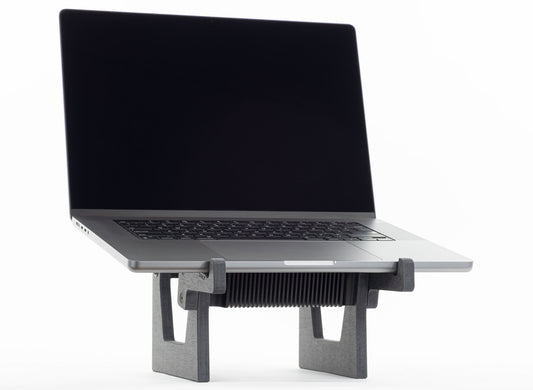
- Fan : A fan located behind the rear screen generates cooling airflow by pulling air from the back and drive it out the front vents against the laptop enclosure. The fan also provides an audio indicator for switch inputs and the system’s enabled cooling mode. When starting the cooling system or changing cooling modes, the fan instantly spins up to maximum speed and then either drops down to a lower speed or turns off based on the cooling mode and measured temperature. When shutting down the cooling system, the fan will stop if it hasn’t already stopped.
- Thermistor : A thermistor located within the top laptop pad measures laptop enclosure temperature in order to automatically adjust fan speeds when one of the three Auto cooling modes are enabled.
System Startup & Shutdown
The following single 1x switch activation provide basic cooling system on/off operation.
- 1x Startup (LED flashes per enabled cooling mode as indicated below) : When the cooling system is shutdown, pressing the switch 1x starts the cooling system in Auto cooling mode by default or the last user saved cooling mode as described below.
- 1x Shutdown (LED fades to off) : After waiting 2-seconds from the last switch depression, pressing the switch 1x shuts down the cooling system.
Auto Cooling Modes
The cooling system runs in Auto cooling mode by default. In addition to the default Auto cooling mode, there are also Auto+ and Auto- cooling modes to help meet different conditions and user preferences. In any of the three Auto cooling modes the cooling system’s external thermistor measures laptop enclosure temperatures and automatically adjust fan speed between 500 and 2200 RPM. This helps keep things quiet when supplemental cooling is not required and then increases fan speed as temperatures rise over the course of a workday. When temperatures are low enough the fan will temporarily stop until higher temperatures are detected, at which point the fan will automatically restart. See the Custom Cooling Modes section below to learn more about each of the three Auto cooling modes.
Turbo Cooling Modes
After starting the cooling system as described above, then the following switch activations will immediately increase the fan speed for an extra blast of cooling power. The Turbo cooling modes are temporary and do not change the last saved cooling mode, and so are meant to be used in conjunction with a user’s preferred normal cooling mode.
- 2x Turbo (rapid flashing LED) : Pressing the switch 2x runs the fan at 2200 RPM until automatically returning to the default Auto cooling mode or the last user saved cooling mode after 10-minutes. Turbo cooling mode provides a moderate increase in fan speed while maintaining moderately low noise levels for a quick boost in cooling power.
- 3x Turbo+ (medium flashing LED) : Pressing the switch 3x runs the fan at 2200 RPM until pressing the switch 1x to return to the default Auto cooling mode or the last user saved cooling mode. Turbo+ cooling mode provides maximum fan speed with high noise levels for a full boost in cooling power.
Custom Cooling Modes
After starting the cooling system as described above, then the following switch activations will change the saved cooling mode. Once one of these modes has been enabled, then the cooling system will return to that cooling mode upon subsequent power restarts or after the use of a temporary Turbo cooling mode.
- 4x Fixed (slow flashing LED) : Pressing the switch 4x runs the fan at 1200 RPM by default or a user’s saved custom fixed speed (see 5x Fixed Customization below). Fixed cooling mode provides a constant speed for precisely meeting a user’s cooling and audio performance requirements.
- 5x Fixed Customization (LED pulses up and down to indicate rising or falling fan programming speeds) : Pressing the switch 5x runs the fan in a cycle from 500 to 2200 to 500 RPM that repeats four times until pressing the switch 1x at the desired fixed speed. The cooling system automatically enters into the Fixed cooling mode at the selected and now saved speed. To select a different speed, then press the switch 5x to restart the process, or reset to the default 1200 RPM speed as described below.
- 6x Auto+ (rapid pulsing LED) : Pressing the switch 6x runs the fan at variable speeds set for cooling priority. Auto+ cooling mode is less likely to turn off in standby mode, to stay on at moderate speeds, and to increase speeds sooner to help stay ahead of heat buildup. Auto+ cooling mode is suggested for cooler offices or for more aggressive cooling within less noise sensitive environments.
- 7x Auto (medium pulsing LED) : Pressing the switch 7x runs the fan at default variable speeds set for a balance of audio and cooling performance. Default Auto cooling mode is more likely to stay off in standby mode or run at lower speeds until temperatures rise, at which point fan speeds will progressively increase to help neutralize heat buildup. Auto cooling mode is suggested for offices with normal temperatures and normal noise sensitive environments.
- 8x Auto- (slow pulsing LED) : Pressing the switch 8x runs the fan at variable speeds set for audio priority. Auto- cooling mode is most likely to stay off in standby mode or run at lower speeds until temperatures rise significantly, at which point fan speeds will begin to increase to help recovery from heat buildup. This cooling mode is suggested for hotter offices or more noise sensitive environments.
Restore Factory Defaults
After starting the cooling system as described above, the cooling system can be reset to factory default settings by pressing and holding the switch for 5-seconds. Once the switch has been held down for 5-seconds and a system reset has been triggered, then the fan will speed up and the system will reset to the default Auto cooling mode and the LED will medium pulse. The Fixed cooling mode will also reset to the default 1200 RPM speed.
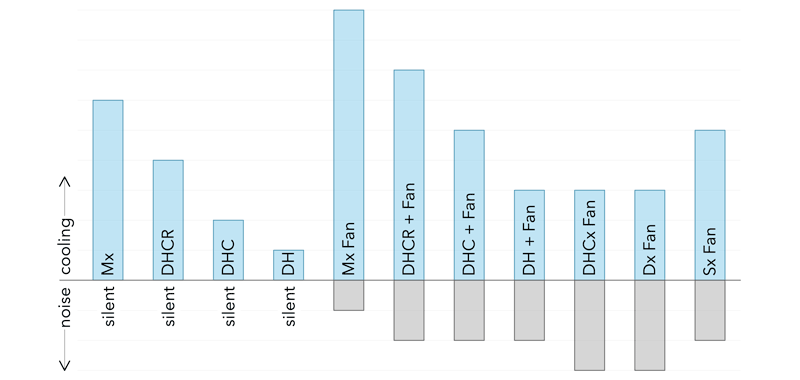
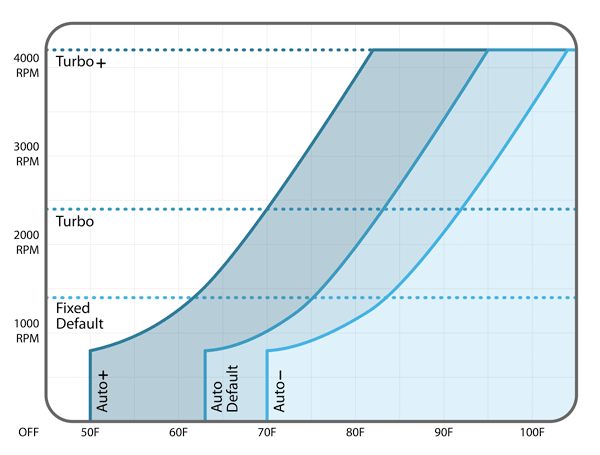
Cooling Mode Diagram v4.0

Back to top
D2 Pro Operation with Firmware Version 3.0
The following operation guide is for the D2 Pro model with firmware version 3.0 available from September 2020 to September 2021.Cooling System Components
The following describes the cooling system’s major user interface components:
- Jack : A power jack located towards the bottom of the rear screen receives a power supply plug for powering the system. Only use the power supply included with product shipment or a Replacement Power Supply.
- Switch : A pushbutton switch located towards the bottom of the rear screen panel controls the system. After starting the cooling system as described below, pressing the switch two times (2x) to eight times (8x) will enable different cooling modes and additional functionality as described below. To register multiple switch entries, each switch depression needs to occur within 1.2 seconds of the last.
- LED : A LED located inside the rear screen and toward the bottom indicates switch inputs and the system’s enabled cooling mode. When starting up the cooling system or changing cooling modes, the LED will indicated the enabled cooling mode for 24-seconds (see Turbo and Custom Cooling Mode sections below for LED signal patterns). When shutting down the cooling system, the LED will momentarily light up and fade to off after 1-second. The LED is placed for visibility when leaning over the laptop and looking down the back side of the dock.
- Fan : A fan located behind the rear screen generates cooling airflow by pulling air from the back and drive it out the front vents against the laptop enclosure. The fan also provides an audio indicator for switch inputs and the system’s enabled cooling mode. When starting the cooling system or changing cooling modes, the fan instantly spins up to maximum speed and then either drops down to a lower speed or turns off based on the cooling mode and measured temperature. When shutting down the cooling system, the fan will stop if it hasn’t already stopped.
- Thermistor : A thermistor located within the top laptop pad measures laptop enclosure temperature in order to automatically adjust fan speeds when one of the three Auto cooling modes are enabled.
System Startup & Shutdown
The following single 1x switch activation provide basic cooling system on/off operation.
- 1x Startup (LED flashes per enabled cooling mode as indicated below) : When the cooling system is shutdown, pressing the switch 1x starts the cooling system in Auto cooling mode by default or the last user saved cooling mode as described below.
- 1x Shutdown (LED fades to off) : After waiting 2-seconds from the last switch depression, pressing the switch 1x shuts down the cooling system.
Auto Cooling Modes
The cooling system runs in Auto cooling mode by default. In addition to the default Auto cooling mode, there are also Auto+ and Auto- cooling modes to help meet different conditions and user preferences. In any of the three Auto cooling modes the cooling system’s external thermistor measures laptop enclosure temperatures and automatically adjust fan speed between 800 and 4200 RPM. This helps keep things quiet when supplemental cooling is not required and then increases fan speed as temperatures rise over the course of a workday. When temperatures are low enough the fan will temporarily stop until higher temperatures are detected, at which point the fan will automatically restart. See the Custom Cooling Modes section below to learn more about each of the three Auto cooling modes.
Turbo Cooling Modes
After starting the cooling system as described above, then the following switch activations will immediately increase the fan speed for an extra blast of cooling power. The Turbo cooling modes are temporary and do not change the last saved cooling mode, and so are meant to be used in conjunction with a user’s preferred normal cooling mode.
- 2x Turbo (rapid flashing LED) : Pressing the switch 2x runs the fan at 2400 RPM until automatically returning to the default Auto cooling mode or the last user saved cooling mode after 30-minutes. Turbo cooling mode provides a moderate increase in fan speed while maintaining moderately low noise levels for a quick boost in cooling power.
- 3x Turbo+ (medium flashing LED) : Pressing the switch 3x runs the fan at 4200 RPM until pressing the switch 1x to return to the default Auto cooling mode or the last user saved cooling mode. Turbo+ cooling mode provides maximum fan speed with high noise levels for a full boost in cooling power.
Custom Cooling Modes
After starting the cooling system as described above, then the following switch activations will change the saved cooling mode. Once one of these modes has been enabled, then the cooling system will return to that cooling mode upon subsequent power restarts or after the use of a temporary Turbo cooling mode.
- 4x Fixed (slow flashing LED) : Pressing the switch 4x runs the fan at 1400 RPM by default or a user’s saved custom fixed speed (see 5x Fixed Customization below). Fixed cooling mode provides a constant speed for precisely meeting a user’s cooling and audio performance requirements.
- 5x Fixed Customization (LED pulses up and down to indicate rising or falling fan programming speeds) : Pressing the switch 5x runs the fan in a cycle from 800 to 4200 to 800 RPM that repeats four times until pressing the switch 1x at the desired fixed speed. The cooling system automatically enters into the Fixed cooling mode at the selected and now saved speed. To select a different speed, then press the switch 5x to restart the process, or reset to the default 1400 RPM speed as described below.
- 6x Auto+ (rapid pulsing LED) : Pressing the switch 6x runs the fan at variable speeds set for cooling priority. Auto+ cooling mode is less likely to turn off in standby mode, to stay on at moderate speeds, and to increase speeds sooner to help stay ahead of heat buildup. Auto+ cooling mode is suggested for cooler offices or for more aggressive cooling within less noise sensitive environments.
- 7x Auto (medium pulsing LED) : Pressing the switch 7x runs the fan at default variable speeds set for a balance of audio and cooling performance. Default Auto cooling mode is more likely to stay off in standby mode or run at lower speeds until temperatures rise, at which point fan speeds will progressively increase to help neutralize heat buildup. Auto cooling mode is suggested for offices with normal temperatures and normal noise sensitive environments.
- 8x Auto- (slow pulsing LED) : Pressing the switch 8x runs the fan at variable speeds set for audio priority. Auto- cooling mode is most likely to stay off in standby mode or run at lower speeds until temperatures rise significantly, at which point fan speeds will begin to increase to help recovery from heat buildup. This cooling mode is suggested for hotter offices or more noise sensitive environments.
Restore Factory Defaults
After starting the cooling system as described above, the cooling system can be reset to factory default settings by pressing and holding the switch for 5-seconds. Once the switch has been held down for 5-seconds and a system reset has been triggered, then the fan will speed up and the system will reset to the default Auto cooling mode and the LED will medium pulse. The Fixed cooling mode will also reset to the default 1400 RPM speed.
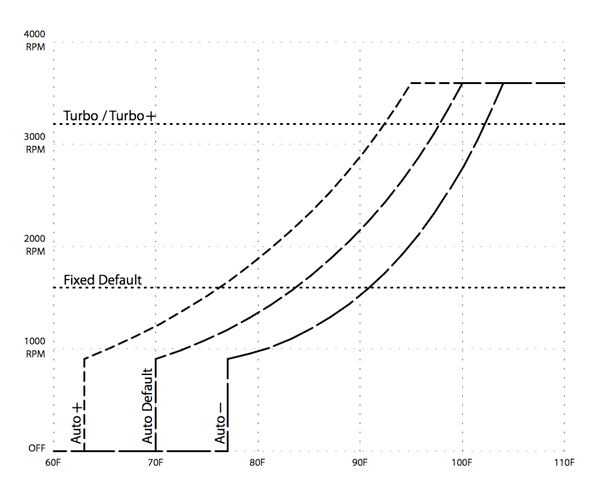
Cooling Mode Diagram v3.0
Back to top
D2 Legacy Operation with Firmware Version 2.0
The following operation guide is for the D2 Legacy model with firmware version 2.0 available from August 2017 to August 2020.System Startup & Shutdown
A pushbutton switch is used to control the system and is located on the rear screen panel. A LED signals switch inputs and the system’s cooling mode (see Turbo and Custom Cooling Mode sections below for LED signal patterns). The LED is located inside the rear screen, along the bottom of the fan. The LED is positioned to be visible when leaning over the laptop and looking down the back side of the dock.
- 1x Startup : To turn on the D2, press the push-button switch once (1x) and the cooling system will start in Auto cooling mode by default (see the Auto Cooling Modes section below to learn about how this cooling mode works, and see the Custom Cooling Modes section below to change cooling modes). When powering on the cooling system or changing cooling modes, the LED will signal the cooling mode for 24-seconds, while the fan provides an audio signal by instantly spinning to maximum speed and then either dropping down to a lower speed or turning off based on cooling mode and measured temperature.
- 1x Shutdown : To turn off the D2, wait a few seconds if you just powered on the D2, and then press the switch once (1x) to power down the cooling system. When powering off the cooling system, the LED will momentarily light up and fade to off after 1-second, while the fan spins to a stop if it hasn’t already stopped.
Auto Cooling Modes
In any of the three Auto cooling modes the cooling system’s external thermistor measures laptop enclosure temperatures and automatically adjust fan speed between 900 and 3600 RPM. This helps keep things quiet when supplemental cooling is not required and then increase cooling power as temperatures rise over the course of a workday. When temperatures are low enough the fan will temporarily stop until higher temperatures are detected, at which point it will automatically restart.
Turbo Cooling Modes
After turning on the D2 by pressing the switch 1x, you can then use the following switch activations to immediately increase fan speed to 3200 RPM for an extra blast of cooling power. These Turbo cooling modes are temporary and do not change the saved cooling mode.
- 2x Turbo (rapid flashing LED) : When you press switch 2x the cooling system will enable Turbo and then automatically return to the default Auto cooling mode, or the last user saved cooling mode after 5-min.
- 3x Turbo + (medium flashing LED) : When you press switch 3x the cooling system will enable Turbo until you press the switch 1x to return to the default Auto cooling mode, or the last user saved cooling mode.
Custom Cooling Modes
After turning on the D2 by pressing the switch 1x, you can then use the following switch activations to change the saved cooling mode. Once one of these modes has been enabled, then the D2 will return to that cooling mode upon subsequent power restarts.
- 4x Fixed (slow flashing LED) : When you press the switch 4x the cooling system will run at a constant 1600 RPM fixed speed by default to provide a balance of audio and cooling performance, or you can save a custom fixed speed to precisely meet your audio and cooling performance requirements as described below in 5x Fixed Customization.
- 5x Fixed Customization (LED pulses up and down to indicate rising or falling fan programming speeds) : When you press the switch 5x the fan will begin to continually cycle from 900 to 3600 to 900 RPM. Press the switch 1x when the fan reaches your desired fixed speed. At this point you have saved a custom fixed speed and entered into 4x Fixed cooling mode. If you change cooling modes and then return to 4x Fixed cooling mode, it will return to your custom fixed speed. If you would like to select a different fixed speed, then press the switch 5x to restart the process, or you can reset to the default 1600 RPM as described below.
- 6x Auto + (rapid pulsing LED) : When you press the switch 6x the cooling system will run at higher speeds for cooling priority. In this cooling mode the fan is more likely to stay on at low to moderate speeds, and will increase speeds sooner to help stay ahead of heat buildup. This cooling mode is suggested for cooler offices.
- 7x Auto (medium pulsing LED) : When you press the switch 7x the cooling system will run at default speeds for a balance of audio and cooling performance. In this cooling mode the fan will stay off or at lower speeds until temperatures rise, as which point fan speeds will progressively increase to help neutralize heat buildup. This cooling mode is suggested for offices with normal temperatures.
- 8x Auto - (slow pulsing LED) : When you press the switch 8x the cooling system will run at lower speeds for audio priority. In this cooling mode the fan will stay off or at lower speeds until temperatures rise significantly, at which point fan speeds will rapidly increase to help recovery from heat buildup. This cooling mode is suggested for hotter offices.
Restore Factory Defaults
To reset the cooling system to factory default settings press and hold the switch for 5-seconds. Once the switch has been held down for 5-seconds and a system reset has been triggered, the fan will speed up and the system will enter into Auto default cooling mode and the LED will medium pulse. The Fixed cooling mode will also reset to 1600 RPM.
Cooling Mode Diagram v2.0
Back to top
D2 Legacy Operation with Firmware Version 1.0
The following operation guide is for the D2 Legacy model with firmware version 1.0 available from October 2016 to July 2017.System Startup & Shutdown
A pushbutton switch is used to control the system and is located on the rear screen panel. A LED signals switch inputs and the system’s cooling mode (see Turbo and Custom Cooling Mode sections below for LED signal patterns). The LED is located inside the rear screen, along the bottom of the fan. The LED is positioned to be visible when leaning over the laptop and looking down the back side of the dock.
- 1x Startup : To turn on the D2, press the push-button switch once (1x) and the cooling system will start in Auto cooling mode by default (see the Auto Cooling Modes section below to learn about how this cooling mode works, and see the Custom Cooling Modes section below to change cooling modes). When powering on the cooling system or changing cooling modes, the LED will signal the cooling mode for 24-seconds, while the fan provides an audio signal by instantly spinning to maximum speed and then either dropping down to a lower speed or turning off based on cooling mode and measured temperature.
- 1x Shutdown : To turn off the D2, wait a few seconds if you just powered on the D2, and then press the switch once (1x) to power down the cooling system. When powering off the cooling system, the LED will momentarily light up and fade to off after 1-second, while the fan spins to a stop if it hasn’t already stopped.
Auto Cooling Modes
In any of the three Auto cooling modes the cooling system’s external thermistor measures laptop enclosure temperatures and automatically adjust fan speed between 0 and 3600 RPM. This helps keep things quiet when supplemental cooling is not required and then increase cooling power as temperatures rise over the course of a workday. When temperatures are low enough the fan will temporarily stop until higher temperatures are detected, at which point it will automatically restart.
Turbo Cooling Modes
After turning on the D2 by pressing the switch 1x, you can then use the following switch activations to immediately increase fan speed to 3200 RPM for an extra blast of cooling power. These Turbo cooling modes are temporary and do not change the saved cooling mode.
- 2x Turbo (very fast flashing LED) Press switch 2x to enable, and then the system will automatically return to default Auto cooling mode, or the last user saved cooling mode after 5-min.
- 3x Turbo + (fast flashing LED) Press switch 3x to enable, and then press switch 1x to return to default Auto cooling mode, or the last user saved cooling mode.
Custom Cooling Modes
After turning on the D2 by pressing the switch 1x, you can then use the following switch activations to change the saved cooling mode. Once one of these modes has been enabled, then the D2 will return to that cooling mode upon subsequent power restarts.
- 4x Fixed (medium flashing LED) Press switch 4x to set the cooling system to a fixed speed of your choosing. The fan continually cycles from 900 to 3600 to 900 RPM, while the LED indicates increasing or decreasing speeds. When the fan reaches your desired speed, press the switch 1x to select a fixed speed, at which point the LED will medium flash. Press switch 4x to restart the selection process. In this Fixed cooling mode you can lock-in the precise fan speed that provides the right balance of audio and cooling performance for your requirements.
- 5x Auto - (slow fading LED) Press switch 5x to set the cooling system to a lower speeds for audio priority, or for a hot office as compared to normal 70 F office temperatures. In this Auto cooling mode the fan will stay off or at lower speeds until temperatures rise significantly, at which point fan speeds will rapidly increase to help recovery from heat buildup.
- 6x Auto + (fast fading LED) Press switch 6x to set the cooling system to a higher speeds for cooling priority, or for a cold office as compared to normal 70 F office temperatures. In this Auto cooling mode the fan is more likely to stay on at low to moderate speed, and will increase speeds sooner to help stay ahead of heat buildup.
- 7x Auto (medium fading LED) Press switch 7x to reset the cooling system to factory default for a balance of audio and cooling performance in normal 70 F office temperatures. In this Auto cooling mode the fan will stay off or at lower speeds until temperatures rise, as which point fan speeds will progressively increase to help neutralize heat buildup. The system can also be reset to factory default by pressing the switch 1x and then holding it down for 7-seconds, at which point the fan speeds up to signal a system reset.
Cooling Mode Diagram v1.0

Back to top
D2 Firmware Upgrade Options
In support of existing Cooling Dock D2 customers, we offer the following discounted upgrade options:- If you have a new D2 Pro model with Version 3.0 firmware and would like to upgrade to the D2n cooling system with Version 4.0 firmware, then the new D2 Pro and D1 Pro models use a modular cooling system that can be exchanged or upgraded with a separate D2n, D2 or D1 modular cooling system (see page for partial refunds options).
- If you have an original D2 Legacy model with either Version 1.0 or 2.0 firmware and would like to upgrade to the new D2 Pro with Version 3.0 firmware, then you can send your original D2 Legacy to us for an upgrade, and we will clean, update to firmware, and install your D2 cooling system in a new D2 Pro aluminum dock with new venting and padding. Please contact us for details. Please contact us for details and cost estimate.
- If you have an original D2 Legacy model with Version 1.0 firmware and would like to upgrade to Version 2.0 (see list of v2.0 revisions below), then we will upgrade the firmware and clean your D2 Legacy at no charge if you cover shipping costs. Please contact us for details.
The following outlines firmware version 4.0’s main revisions over version 3.0:
- 2x Turbo cooling mode has been revised to run at 2200 RPM and automatically return to the normal cooling mode after 10-minutes. This allows for a quickly enabled boost in cooling for noise critical environments.
- 3x Turbo+ cooling mode runs at 2200 RPM for noise critical environments.
- 4x Fixed cooling mode’s default speed has been decreased to 1200 RPM for silent base level cooling that can be combined with Turbo’s 2200 RPM cooling when needed.
- 5x Fixed Customize cooling mode’s range has been revised to 500-2200 RPM for noise critical environments.
- 6x Auto+ cooling mode’s range has been revised to 500-2200 RPM for noise critical environments.
- 7x Auto default cooling mode’s range has been revised to 500-2200 RPM for noise critical environments.
- 8x Auto- cooling mode’s range has been revised to 500-2200 RPM for noise critical environments.
- The reset to factory default has been revised to reset Fixed cooling mode to the default 1200 RPM.
The following outlines firmware version 3.0’s main revisions over version 2.0:
- 2x Turbo cooling mode has been revised to run at 2400 RPM and automatically return to the normal cooling mode after 30-minutes. This allows for a quickly enabled boost in cooling with moderate noise levels, and to better compliment the standard cooling modes.
- 3x Turbo+ cooling mode has been increased from 3600 RPM to 4200 RPM because the D2 Pro allows for freer airflow and for the fan to run at a faster speed. This allows for even more intense cooling airflow when required.
- 4x Fixed cooling mode’s default speed has been decreased to 1400 RPM to quieter base level cooling that can be combined with Turbo’s 2400 RPM cooling when needed.
- 5x Fixed Customize cooling mode’s range has been expanded from 900-3600 RPM to 800-4200 RPM because the D2 Pro allows for freer airflow and for the fan to run at a faster speed.
- 6x Auto+ cooling mode’s range has been expanded from 900-3600 RPM to 800-4200 RPM because the D2 Pro allows for freer airflow and for the fan to run at a faster speed, and the temperature mapping has been refined with adjustments to be even more aggressive.
- 7x Auto default cooling mode’s range has been expanded from 900-3600 RPM to 800-4200 RPM because the D2 Pro allows for freer airflow and for the fan to run at a faster speed, and the temperature mapping has been refined.
- 8x Auto- cooling mode’s range has been expanded from 900-3600 RPM to 800-4200 RPM because the D2 Pro allows for freer airflow and for the fan to run at a faster speed, and the temperature mapping has been refined with adjustments to be less aggressive.
- The reset to factory default has been revised to reset Fixed cooling mode to the default 1400 RPM.
The following outlines firmware version 2.0's main revisions over version 1.0:
- 4x Fixed cooling mode has been revised to start with a default 1600 RPM fixed speed or a user’s saved custom fixed speed.
- 5x Fixed Customize cooling mode has been added as a separate mode for the user to select a custom speed for 4x Fixed cooling mode. This allows the cooling system to save the user’s custom fixed speed so that it can be reactivated without having to reselect a fixed speed, which can be helpful when a user wants to change between modes to meet various audio or cooling performance scenarios.
- 6x Auto+ cooling mode has been revised with significantly more aggressive mapping.
- 7x Auto default cooling mode has been revised with slightly more aggressive mapping.
- 8x Auto- cooling mode has been revised with slightly less aggressive mapping.
- The reset to factory default has been revised to reset Fixed cooling mode to the default 1600 RPM.
- The order of cooling modes has been revised along with associated switch activations required to enable the cooling modes.
Resolving D2 System Issues
The following section provides an outline for the most common ways to resolve D2 cooling system issues.D2 Cooling System Reset
Reset the system as described above per the D2 model.
D2 Cooling System Diagnostic Test
Activate the D2’s built-in system diagnostic test with the following steps:
- For the D2 system to properly calibrate during testing, the thermistor reading needs to be between 65-80F (18-27C), so the ambient room temperature needs to be within that range before starting the test or a false error will result.
- Unplug the power cable from the wall outlet if it is accessible, or if it is not accessible, then unplug the power connector from D2’s power jack.
- Press and hold the D2’s push-button switch. While continuing to hold the switch, plug the power back into the wall outlet or D2’s power jack.
- Release the D2’s push-button switch once the power is connected, the LED lights up, and the fan begins to spin.
- An internal diagnostic program will start to run. The LED will flash various codes and the fan will spin up & down. Just ignore all of that and let the system run for approximately 15-seconds.
- If there is no error code, then the LED will stop flashing and the cooling system will go into off/stand-by mode. Pressing the D2’s push-button switch once will restart the cooling system into normal operations.
- If there is an error then the LED will flash the same code indefinitely. That means the LED will still be flashing after multiple minutes, and will not stop until pressing the D2’s push-button switch or unplugging power. If there is an error code, then the easiest way to identify the code is to capture a video of the flashing LED and reply at a slower speed to count the number of flashes in a single cycle of successive LED flashes. Please contact us with the error code.
D2 Cooling System Cleaning
Dust buildup on the circuit board and inside of the fan motor can cause issues that can be resolved by removing the dust. See the Right-to-Repair page to learn how to remove and clean the D2 cooling system.
D2 Cooling System Replacement
See the Upgrades page to learn about D2 cooling system replacement options.
Back to top